Monday, October 31, 2011

Quick Craft & Some Halloween Fun

I saw this garland project on Curbly and thought it was really cute. Extra bonus it's super easy to make! So even though today is Halloween I went a head and made it. 


I tried to use Fall colored candy so I can leave it up for Thanksgiving. All you need is some colored candy of your choice and a stapler! Solid colors work best, you could even make this for any holiday- Christmas, Valentines, ect.  


To make the garland just use your stapler to staple the pieces end to end. Try to get as much of the wrapping stapled as possible so it won't unravel. 


And that's it! Just staple away until you have the desired length, then hang. For and estimate on how much you need- 30 pieces = about 5'.


Also this weekend we participated in the Altus Air Force Base Trunk or Treat. We decorated my car like a monster (The Murano Monster) and handed out candy to the kids on base.


ROAR!!! Scary stuff! 

Con-Man got to try out his Mater costume I made him:


(He's kind of hard to get a picture of these days)


The whole family dressed up for the occasion. The Hubs was a nerd and I dressed up as the lady from "The Birds".


I hope everyone is having a fun safe Halloween!

Friday, October 28, 2011

Latest Thrifty-ness

A friend and I decided to venture out of Altus and check out some of the thrift/ antique stores the surrounding cities. Our first stop was Blair, OK. Calling it a city is a stretch; its more of a town. (The high school, middle school, and elementary are all in the same building!) But it's the closest town to Altus so thats where we went.


The best place we went was Schoolhouse Collectibles. I knew it was going to be awesome the minute we drove up. Outside treasure trove of rusty junk. We had to stop here. 


(These wheels are as tall as I am! I wanted one but it was a little unnecessary) 


There was one guy working there and they are only open on Saturdays. Though he was really nice I thought his prices were a bit high (I mean we are out in the middle of nowhere...). I felt like I'd pay the same prices back in San Antonio.

So while there was a ton of stuff I wanted I only walked away with 3 things. Which is bad because I told the hubs I wouldn't buy anything- oh well!

The first thing I got was this old ceiling tin.


It's a little beat up, I literally dug it out of the ground. He sold it to me for $10- not bad considering the shape it's in. I figure I can make something out of it.


The first thing I saw when we walked inside was this Fleur de Lis frame. 


I love Fleur de Lis, they reminds me of home in Louisiana. There were a few of them all marked $7 and up. I liked the frame on this one so I grabbed it.


The other thing I got was this Stop Sign and I now consider it my most prized possesion. 


That might be weird but when I saw it I fell in love- I've always wanted a stop sign! And the bullet holes in it just made it that much cooler. 


He had some other stop signs priced around $40, but some of the older ones were more like $60. This one wasn't marked. So I asked him- he glanced around and said $40. After some friendly banter about LSU and Oklahoma I asked him if he'd take $30. For an LSU fan he said he would. Later I think he realized that he gave me a better deal than he wanted because he kept saying the older ones like mine usually go for more and that I could sell it for double that if I wanted. So I quickly paid and got out of there before he changed his mind!


The hubs was not so impressed with my sign. My idea of hanging it in the dining room didn't seem to thrill him all that much. I thought it would be funny hanging over our wine rack- he wasn't so sure. (The fact that I had told him I wasn't going to buy anything in the first place didn't help I'm sure)


After mulling it over I had an epiphany. Con-Man's room! Soon I'm going to redo his room in a car theme- the Stop Sign will be perfect! He's going to be the coolest kid on the block. I'm so excited about it.


How about everyone else? Any good thrifting adventures lately? Every bring something home that raises your spouses eyebrows?

Wednesday, October 26, 2011

Vintage Door Knob Wall Hanger

I hope everyone is entering the Dremel Giveaway! You have until Tuesday to enter! 


I worked on a little project last week that I think is really fun. I've mentioned in the past that our old home was a gift that kept on giving; well even though we don't live there anymore it's still giving me supplies for projects today!


When we moved in I found several old door knobs leftover from who knows when. 


I had been wanting to make a coat/ purse hanger with them but wasn't sure how to attach the knobs to wood. It wasn't until I saw this post on Infarrantly Creative that I found the answer. She used this resin mixture to fill the holes in the knobs, luckily I had some leftover from another project I was able to use. It's easy to use but messy. It comes with two resins that you mix equal parts of, then pour in the knob holes and let it dry. 

Other materials you will need:

Vintage Door Knobs
Hangar Bolts (a screw with points on both sides- I had to ask around the store to find out what they were)
Two Part Resin
Drill and bit
Clear Tape
Disposable Cups and stirring sticks
Locking Pliers

1. Use the clear tape to cover the hole that is in the knob. Press it down and make sure it sticks well.

2. Mix equal parts of the resin in the mixing cups and stir. Pour it into the holes of the knob and fill it all the way up to the top.


3. Once the mixture has cured overnight it's time to drill. Use a drill bit that is slightly smaller than the hangar bolts your going to use.


4. Use the pliers to screw the bolt into the resin. This was the toughest part. I had to put some rubber gloves on the be hold the knob tightly while screwing the bolt.


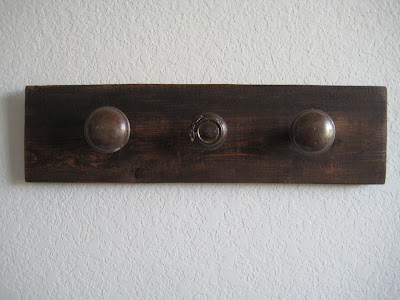
Once that was over it was time to ready my wood backing. I used some more of the pallet wood I had leftover from my sign projects and stained it a dark walnut.


I drilled 3 pilot holes then screwed the knobs into place.


All done!


I really like the look of the brass knobs with the stained wood. I have it hanging near the door for now to use for hanging my purse, hats, scarf, whatever!

The resin is a great technique to use for repurposing old knobs. If you don't want a purse hanger you can use them for knobs on drawers, screw them straight into the wall, whatever!

What would you do with old knobs?

Tuesday, October 25, 2011

WIN! A Dremel Multi-Max MM20

This giveaway is now closed- check back soon for the winner!


Whoooo's ready for another giveaway?? Oh me! Me me me!!

As we all know Dremel has partnered with the fabulous and oh so handsome Chip Wade from HGTV's "Curb Appeal: The Block" and "Designed to Sell" and you might have caught him on this season's "Design Star"; to help American's tackle their top "To Do Lists."


Each month Dremel and Chip release a new video guiding viewers through step- by step instructions and tool recommendations for tackling their to do list.

And, each Tuesday YOU can chat with Chip personally and ask him your burning DIY questions, (or just ask him what his favorite color or meal is- I'm sure he'll be happy to answer. ;) on Dremel's Facebook page! (That's today check it out!!)

Now for some exciting news you may have not heard about yet; Dremel is launching yet another brand new cutting tool; the Multi-Max MM20. This baby will not hit store shelves until mid November, but you have the chance to win one right here today.


ReleaseImg.jpg

The new Multi-Max MM20 will "allow users to tackle a wider array of oscillating applications with increased tool power and capabilities – making any task on a do-it-yourselfer or remodeler’s to-do list that much easier to complete.
The Dremel Multi-Max MM20’s 2.3 amp motor is more powerful than the Dremel brand’s current oscillating tool, enhancing tool performance and allowing for faster, more precise cuts in a wide variety of materials. With a variable speed range of 10,000 – 21,000 oscillations per minute, the MM20 allows DIYers to power through their to-do lists with detail, precision and optimal performance."


Check out Chip taking on a tile re-grouting project using the Milti-Max MM20; a project that according to a survey of homeowners was on their Top To Do List.


If you have already used Dremel products you know this one is going to be good. And if your ever looking for inspiration or ideas for a project check out Dremel's Website for lot's of project step by steps and videos. They're even having they're annual Pumpkin Carving Contest going on right now!

So, want to win one? All you have to do is follow the directions below!


To Enter:

1. "Like" Dremel on Facebook and mention Adventures In Creating on their wall (Leave comment below)

2. Follow Dremel on Twitter and tweet about this giveaway saying: I want to win @aicreating #DremelDIY (Leave comment below)

3. If you need some extra luck follow Adventures In Creating for a third entry and leave a comment below.

That's it! Easy~ I'm so excited. What are you waiting for? Good luck!!

Disclaimer blah blah blah: Giveaway closes November 1, 2011 and winner will be announced shortly after. This giveaway is only open to residents of the continental US and Canada, no PO boxes please. Only 3 entries per person. Please leave a valid email address. Winner will be selected by Random .org. Number of winners: 1

Note: I have not been compensated for this giveaway. I just love Dremel and want to spread the love around!


Friday, October 21, 2011

Tailgate Time!

Sorry- no crafty projects or furniture re-dos today. We're on our way back home to Louisiana for some family, friends, and football fun!


We're going to the LSU/Auburn game Saturday. I'm so excited because we're getting together with a bunch of our friends for a huge tailgate. Here are some pics from the past ones we've had:


And we're even going to New Orleans for the Saints/ Colts game on Sunday! The last game we went to was a few years ago. (Hopefully this year I can take a pic without crazy hair)


Some of our friends from Virginia are coming down to meet us for the weekend as well. We're super excited! 

I hope everyone has a fun safe weekend!

Wednesday, October 19, 2011

Mmmm! Cake Balls

This past weekend we had friends over to watch the LSU/ Tenessee football game. (if you haven't noticed the Tigers are #1!) Geaux Tigers!!


I was looking for a fun cookie recipe to make that I could add some purple and gold icing to, but I came across my Cake Ball recipe first. OOOooo... I haven't made these in a while. They take a little while to make but are dangerously good.


The recipe I have is from The Dallas Morning News. It's a great article talking about how to make cake balls and suggests lots of different flavoring and color ideas. 


Following their recipe I mixed yellow cake and cream cheese icing for the batter. 


As usual I forgot to take pictures of the rest of the cooking method because I'm so busy pouring over the recipe. But- basically I used a melon baller to scoop the batter and hand rolled them. Then refrigerated them, then took them out in batches to roll them in the icing. I used vanilla almond bark for the icing and added some vegetable oil to the mixture like the recipe instructed. This helped the icing not be so thick and roll easier onto my cake balls. The link to the article has really good detailed instructions on what to do!


I used food coloring to get the purple and gold colors. My favorites are the purple ones. They may not be as pretty as professional cake balls but I can almost guarantee they are just as good.


These were a hit at the party- they are easy to eat and went quickly. It was hard not to eat a whole bowlful on my own!

Do you have any favorite football party snacks?

Monday, October 17, 2011

DIY Super Cheap Metallic Pattern Curtains

Ok, when I say cheap I mean super cheap- way cheaper than you might think. I'm talking $5 per panel cheap. I've been searching for some nice looking inexpensive curtain panels for our living room. I wasn't looking for anything super fancy, just something simple and classic. My search wasn't turning up any options. I first looked at West Elm, Pottery Barn, and Crate and Barrel for ideas of what is out there. Then looked at places like Ikea and Target to see if I could find something similar in style but for less $$$.


But even my usual go to places for high style for less price weren't giving me any options I thought would work either. My problem is that I need a lot of panels- 5 to be exact for our living room. So that can add up quickly. 


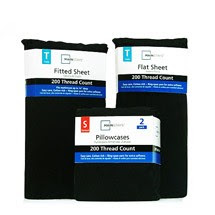
So while I was at Walmart the other day I noticed that their Mainstays cotton sheets came in a lot of colors. And you can buy them separately, not in a full set as most sheet come. I had used sheets for Con-Man room with some success and thought these were my answer.


So I bought 5 of them in Navy Blue for $5 each and hung them up in the living room. Later that evening when the Hubs came home he noticed them saying- "These are kind of plain don't you think?" Whoa- he never comments on any of my projects other than a smile and eye roll. This was serious. I mean, they are kind of plain because they're sheets.... not curtains. So what to do??

I had a large Royal Design Stencil that I won from Made By Girl that I had been meaning to use in our bedroom. Maybe this was the perfect time to try it out. Though most people use them on the was I figured it was ok to use it on fabric. 

Using some leftover Poly acrylic paint, plastic drop cloths, and the brush they provided I got to work.


The process was pretty simple. I started in a corner and worked my way over. The stencil has guides that show you where to overlay it next. After a while I had this:


And just a warning (they might have this on their website or something) don't use a roller when using the clear lacquer. It might be ok to use on a wall with latex paint but I tried rolling the lacquer on first with a roller and got this:


It bled through really badly even though I tried to roll most of the lacquer off. Needless to say that corner went in the very back on the bottom. After I learned that lesson I used the brush they provided and got this:


So much better! It took longer (5 hours for all 5 panels) but the result was well worth it.

Once I was finished and all had dried I pulled the panels off the plastic drop cloth, it stuck a little bit but came off clean. This is when I noticed a happy accident.

The front of the panel had the design I painted, a subtle patten like I had wanted.


But the back is where I got a real surprise:


Apparently when the cloth stuck to the drop cloth some of the plastic must have stuck on to it, giving me a metallic pattern. Cool! 

I liked this even better than the original design I had intended- so I hung them with the "back" facing the front. It's a pretty cool effect. It's still subtle- the light catches the design at different times of day; but it's noticeable and really cool!


I hung the curtains higher than the windows. Our ceilings are really tall, so I like the height the curtains gives the room. Not bad for $5 sheet right? Now the hubs approves! 


So if you want to try this yourself here are my tips: 

- Use the fat bristle brush intended for stenciling.
- Use the thick lacquer clear gloss (mine was semi gloss)
- Use a plastic drop cloth, not a fabric one
- If you need curtains that block light, you can use the white or same colored sheets as a liner
- Don't have a stencil? Even if you decided to buy one you still come out on top money wise if you use sheets because they are so inexpensive. Plus you could use the stencil for other projects! Worse case scenario you could always try to make a stencil or free hand a design like I saw here

Total Cost: Sheets $25 for 5 flat sheets
                    Rings $25 for 5 sets
                    Rod- Free! Came with the house
                    Lacquer- leftover from another project

$50 for a wall full of curtains ain't to shabby.

I'd love to hear if anyone else tries this out!

And last week some of you were asking about the orange chairs. While I do like the blue and orange combo the fabric on the chairs is not in the best of shape- stains, coming off in a few spots- things you would expect from vintage furniture. They're working good for now but I'm going to reupholster them sometime in the future.